My love for sewing and crafts was established in my pre-teens and fully encouraged by my grandmother and parents. Although I thoroughly enjoy sewing for my home, I find that the real excitement and full satisfaction comes from creating for others.
I finished Block 6 and all caught up! Thank you Gina for a much easier block after the cables block. This was easy to memorize and an easy knit. I may have made it too long. Blocking will tell. I can always rip back a few rows.
Block 7 was released a week or so later. Again, an easy block. I followed the written directions, rather than the chart. I just wasn't ready to learn that option. I'm sure I'll get it eventually, in combination with the written directions. In crochet, I used them in combination. They are very handy, especially when the written instructions are a bit confusing.
Cooler Liner/Pot Holder
I picked up the crochet hook for the first time since March. Husband wanted a liner for his cooler to absorb the condensation from the ice packs. Last time I used a dishcloth pattern, but this time I thought I would make it a bit thicker. I choose The Best Crochet Potholder by Heather Tucker. I've made this pattern before for potholders. It creates a very thick and dense fabric. After the first row of single crochet, you actually crochet two rows together for the rest of the project. Easy and quick, check it out.
Corner to corner baby blanket. I've never done this technique and really enjoyed the process. I started the with a huge ball of Jo-Ann's Rainbow Sensations. Not really knowing how much yarn a baby blanket would take, I just thought a big ball would do a small blanket. Wrong! This yarn was part of my stash and out of production. Since it was a discontinued line, I went searching for some left overs on Ravelry. A gracious Ravelry member sent me her leftovers, however, not quite enough. I stumbled upon the “revised version” in Jo-Ann’s. Although it is still a number 5, it seems smaller. Can you tell the difference from the stitch marker to the corner?
I put this into hibernation since I didn't have a designated recipient and hadn’t decided on a border. Now that my niece is due in August, I decided to add the basic border demonstrated by Mikey of The Crochet Crowd.
Perk Me Up
I finished the Perk Me Up cowl written by Erin Donahue of GimmeYarn418 on YouTube. It was an
easy knit, especially for a beginner. The pattern was super easy to follow and came with a chart. I've never knit from a chart before, but because the cowl is knit in the round, I found myself using the chart automatically. I used Caron's Simply Soft in soft pink.
Seat Belt Pockets!! Seat Belt Pockets come in three styles: The Two Pocket Bi-Fold, the Three Pocket Bi-Fold, and the Three Pocket Tri-Fold. The bi-fold two pockets are good size and will hold my iPhone 6. The tri-folds are more snug
around the belt making the pockets a bit smaller and tighter. The three pocket items have a full size pocket on the back. I like to use mine for a notions bag when I'm not traveling. All of these Seat Belt Pockets attach with magnetic snaps for an easy on/easy off operation. Each style will fit around the shoulder belt and can be positioned where it is most comfortable for you. But don't limit this item to your car, it can be snapped around the strap(s) of a shoulder bag, luggage or project tote.
I put together a couple more project bags. These are a bit smaller than the trave bag. I like this size for the smaller projects, and they can double as a purse. Throw in a wallet and go! The inside pocket is perfect for your DPNs.
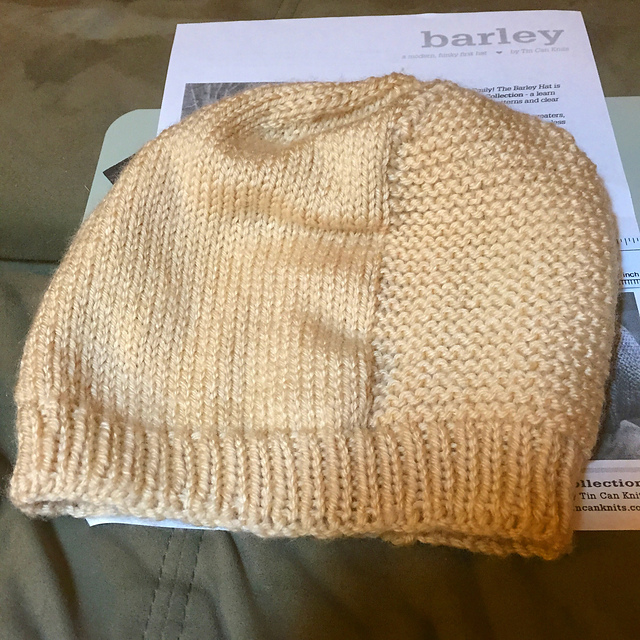
I did it!! I made my very first hand knitted hat!! The first time I used double pointed needles also. Wow, did I feel clumsy. I'm so excited. Such a feeling of accomplishment! Silly? Not for this old goat! :)
The pattern was Barley by TinCanKnits. It is part of a learn to knit series by The Simple Collection. I used Vanna's Choice colorway beige. I enjoyed the pattern, it is a simple knit.
Finished Block 5. Cables! I understood the concept from crochet and loom knitting, but the needles made it challenging. I zigged when I should have zagged at one point. When I noticed it several rows later, I was afraid to frog, not knowing where in the pattern I would end up. Then closer to the end I doubled a couple of rows. I couldn't leave it, so I frogged. It was hard to find my place, but I think it turned out ok for a learner project.
Recently, I had the great privilege to make a travel project bag and notions pouch for Codi Knits. He was very enthusiastic about the new design for the notions pouch that I spoke of in my last podcast and blog post. What a joy it was to make something for someone who would really appreciate it! I made it right away and mailed it out. He let me know he got it and was very pleased with it.
To my surprise, a few days later came a wonderful package in the mail. To say thank you, Mr. Codi sent a thoughtful thank you gift of fabrics and teas and notions and chocolates! Wow! He sure knows how to spoil a girl! Isn't that bear fabric just adorable?
As I was digging around in my stash of fabric, I came across two panels of cat fabric. I have no idea how long I have had those panels. Since I was in need of new project bags anyway, I thought they would do nicely. I lined it in gray cotton fabric, added a couple of handles, included an inside zippered pocket, and voila, a good size project bag I can toss in my phone and ID and I am off.
We continue to explore Tennessee. Recently we took a day trip to Sevierville to visit the flea market and ended up at the Tennessee Air Museum afterwards. Husband found it very interesting. They had a huge area where they stored all sorts of planes. I understand they take a few of them to air shows as well.
On our way to the museum, we saw that the traffic was backed up for miles in the opposite direction, to get back on the interstate. The only thing we could figure would cause that on a Sunday, was a traffic accident or the construction that was blocking some lanes. Not wanting to get involved in that mess, we decided to take the back roads out of town. Wouldn't you know it, just as we were waiting for the light to turn, an ambulance went around us and turned down our route. A mile or so down the road we were at a dead stop, for 45 minutes. I'm so glad I had a knitting project with me! My only fear at that point was that I may run out of yarn before we got home. :) But I didn't, so I still have my sanity, so to speak.
Thank you to all who watch, like, comment and/or subscribe. Feel free to comment and make suggestions. I appreciate the feedback.
I would like to say a BIG Thank You to all of you that commented on the Crossword Puzzle blanket shown on my YouTube channel. They were all so kind and encouraging.
After a coupon code was shared by Amy, Green_Feather7 on Instagram, I decided to place my order for some gadgets I found on Knit Picks. I had been wanting a ball winder for some time, but all I could find was an electric one for way more money than I wanted to spend. After seeing the crank ones on YouTube, I went searching for the cheaper option. Of course, I found other items I had been craving like Wonder Clips and a yarn stranding guide. The coupon was for a free ball of Lindy Chain, which I got in Whisper, a shade of lavender. I actually got the free yarn, free shipping and tax.
The Wonder Clips are great for holding two fabrics together before sewing. I use them for sewing and for crochet and knit projects. I searched high and low for the stranding guide in stores with no success. I wanted it for protecting my fingers when working with holiday yarn that has the strand of metallic thread. While making my Christmas tree, I had to place bandaids on the fingers that the yarn was wrapped around. That strand was making my fingers raw. I'm hoping this will solve the issue.
I also bought a Try It Needle Set. It contains one set of size 6 Caspian Wood tips and one set of size 7 Nickel Plated tips, with a 24" cable and 40" cable. Since I am so new to knitting, I thought this may help me decide what type of needles I like best.
Block 3
Block 4
The Brownie Knits Blanket Along blocks are coming along nicely. I've learned so much and I'm getting plenty of practice. I finished block 3 and block 4. I'm about halfway through with block 5. I am some what behind. I am slow compared to a lot of knitters, not just because it's a new skill, but that's how I roll with all crafts.
I finished the Bakery Bears Handbrake Cowl last week. It was a fun and easy knit. Thank you YarnieLadyBug for gifting me the pattern. In return, I will also gift the pattern to three Ravelry members who would like the pattern. All the proceeds for the sale of this pattern will go to cancer research. The first three that ask in a comment posted on my YouTube video and who give me their Ravelry name, will receive a pattern download email. I would love to see your finished projects.
Since I don't like guessing and wasting yarn, I have been a bit frustrated with the long tail cast on. I haven't done much research on the subject, but what I have seen and heard is that it's a best guess as to how much yarn you leave to accommodate the cast on. When you're casting on a great many stitches, it's a pain to redo it until you've got it right. I tried to take the mathematical approach.
I casted on 5 stitches and removed the needle. Grasping the tail at the first and last stitch, I unraveled them to see how much tail yarn was used. I measure this bit and came up with about 3 inches. Dividing the total number of cast on stitches, (120) by the 5 that I used to gage my tail length gave me 24. That is 24 three inch sections. 24 times 3 is 72 inches of yarn for a tail. I added another six for sewing in, just it case it worked exactly. To my surprise the cast on was a success and I had only a couple of more inches left to my original addition of six. I tried the same method when I casted on the Brownie Knits Block 5. Again, a success. Was this a fluke? Has anyone else tried it this way?
I won a set of three stitch markers made by Hooked in Yarn. She does fabulous work in polymer clay. Crochet and knit stitch markers, buttons and crochet hook handles, all beautifully decorated. Check her out on Facebook.
Several months ago I made a notions pouch that wrapped around the shoulder belt of the truck. Twice I lost my crochet hook in the door frame because I laid it down and it slid off my lap. It was the perfect size to roll right into the door frame with no way to retrieve it until you opened the door. I designed this pouch based on the shoulder protectors normally found in automotive aisles. So the pouch has two pockets that hold my crochet hook or knitting needles or scissors or anything else I don't want to fall off my lap when we round a corner. The back side has a full pocket with a flap. This serves a notions pouch when not on the seat belt.
Because the normal belt protector used velcro, I used it too on the prototype. It worked great on the first trip. Forgetting that yarn and velcro do not get along, I dropped it in my bag open. It didn't take me twice to remember to close off the velcro before it comes into contact with my yarn.
My aunt gave me a tote bag she had stashed away in a drawer. I found it to be the perfect size for carrying my yarn projects with me as we travel. But since it had a giant poinsettia blossom on it, I wanted something a little more everyday. So I decided to make my own. I added a pocket to the inside large enough to house my phone and keys.
I decided to use magnetic snaps, most often used on purses today. Adding them to the tote bag and to the shoulder harness pouch eliminated the velcro nightmare. That also made it much easier to attach and remove from the seat belt. I arranged the snaps in such a way that the notions pouch could be attached to the inside of the tote bag when I'm not using it in the truck. I think it came out great! As with any prototype, I'll use it and see if there are any improvements to be made.
If you have any suggestions or questions, feel free to comment. I welcome your input. Enjoy your weekend, but don't forget the real reason for the holiday: Remembering the people who died while serving in the country's armed forces. Thank you to all who are and have served to defend our country and our freedom.


 Corner to corner baby blanket. I've never done this technique and really enjoyed the process. I started the with a huge ball of Jo-Ann's Rainbow Sensations. Not really knowing how much yarn a baby blanket would take, I just thought a big ball would do a small blanket. Wrong! This yarn was part of my stash and out of production. Since it was a discontinued line, I went searching for some left overs on Ravelry. A gracious Ravelry member sent me her leftovers, however, not quite enough. I stumbled upon the “revised version” in Jo-Ann’s. Although it is still a number 5, it seems smaller. Can you tell the difference from the stitch marker to the corner?


